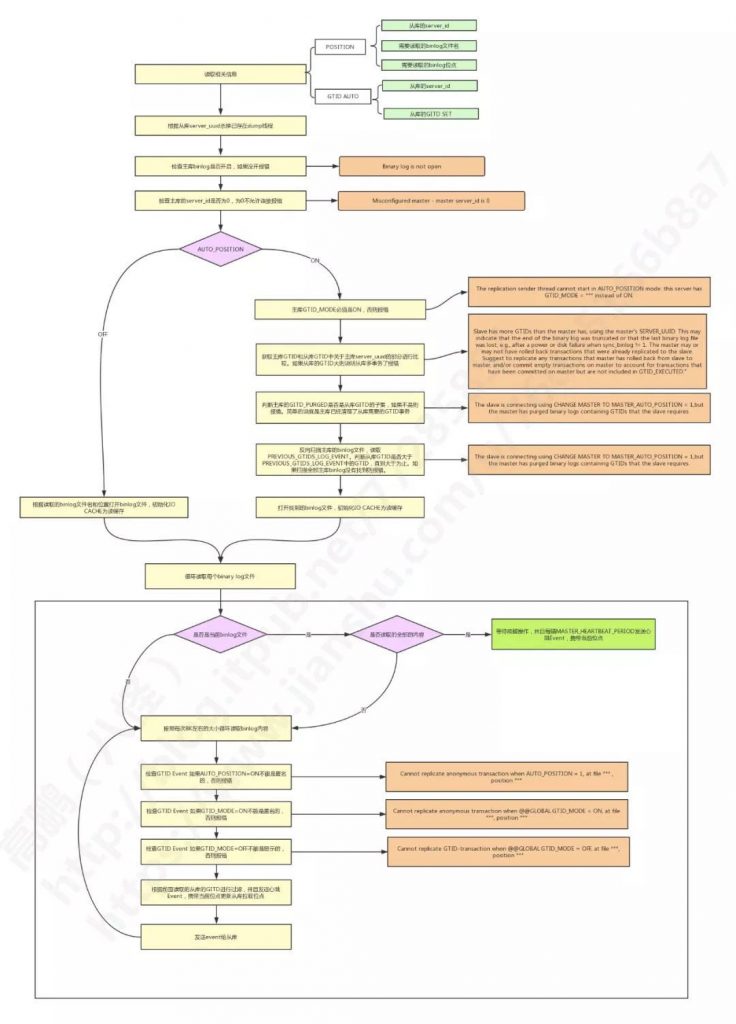
作者:高鹏
文章末尾有他著作的《深入理解 MySQL 主从原理 32 讲》,深入透彻理解 MySQL 主从,GTID 相关技术知识。
源码版本:5.7.22 水平有限,如有误请谅解


本文建议横屏观看,效果更佳。
一、案例来源和现象
这个案例是朋友 @peaceful 遇到的线上问题,最终线索也是他自己找到的。现象如下:
1、出现了大量很小的 relay log 如下,堆积量大约 2600 个:
  1. ...

  2. -rw-r----- 1 mysql dba 12827 Oct 11 12:28 mysql-relay-bin.036615

  3. -rw-r----- 1 mysql dba 4908 Oct 11 12:28 mysql-relay-bin.036616

  4. -rw-r----- 1 mysql dba 1188 Oct 11 12:28 mysql-relay-bin.036617

  5. -rw-r----- 1 mysql dba 5823 Oct 11 12:29 mysql-relay-bin.036618

  6. -rw-r----- 1 mysql dba 507 Oct 11 12:29 mysql-relay-bin.036619

  7. -rw-r----- 1 mysql dba 1188 Oct 11 12:29 mysql-relay-bin.036620

  8. -rw-r----- 1 mysql dba 3203 Oct 11 12:29 mysql-relay-bin.036621

  9. -rw-r----- 1 mysql dba 37916 Oct 11 12:30 mysql-relay-bin.036622

  10. -rw-r----- 1 mysql dba 507 Oct 11 12:30 mysql-relay-bin.036623

  11. -rw-r----- 1 mysql dba 1188 Oct 11 12:31 mysql-relay-bin.036624

  12. -rw-r----- 1 mysql dba 4909 Oct 11 12:31 mysql-relay-bin.036625

  13. -rw-r----- 1 mysql dba 1188 Oct 11 12:31 mysql-relay-bin.036626

  14. -rw-r----- 1 mysql dba 507 Oct 11 12:31 mysql-relay-bin.036627

  15. -rw-r----- 1 mysql dba 507 Oct 11 12:32 mysql-relay-bin.036628

  16. -rw-r----- 1 mysql dba 1188 Oct 11 12:32 mysql-relay-bin.036629

  17. -rw-r----- 1 mysql dba 454 Oct 11 12:32 mysql-relay-bin.036630

  18. -rw-r----- 1 mysql dba 6223 Oct 11 12:32 mysql-relay-bin.index

2、主库错误日志有如下错误

  1. 2019-10-11T12:31:26.517309+08:00 61303425 [Note] While initializing dump thread for slave with UUID <eade0d03-ad91-11e7-8559-c81f66be1379>, found a zombie dump thread with the same UUID. Master is killing the zombie dump thread(61303421).

  2. 2019-10-11T12:31:26.517489+08:00 61303425 [Note] Start binlog_dump to master_thread_id(61303425) slave_server(19304313), pos(, 4)

  3. 2019-10-11T12:31:44.203747+08:00 61303449 [Note] While initializing dump thread for slave with UUID <eade0d03-ad91-11e7-8559-c81f66be1379>, found a zombie dump thread with the same UUID. Master is killing the zombie dump thread(61303425).

  4. 2019-10-11T12:31:44.203896+08:00 61303449 [Note] Start binlog_dump to master_thread_id(61303449) slave_server(19304313), pos(, 4)

二、slave_net_timeout 参数分析
实际上第一眼看这个案例我也觉得很奇怪,因为很少有人会去设置 slave_net_timeout 参数,同样我们也没有设置过,因此关注较少。但是 @peaceful 自己找到了可能出现问题的设置就是当前从库 slave_net_timeout 参数设置为 10。我就顺着这个线索往下分析,我们先来看看 slave_net_timeout 参数的功能。
当前看来从库的 slave_net_timeout 有如下两个功能:
  • 1. 设置 IO 线程在空闲情况下(没有 Event 接收的情况下)的连接超时时间。

这个参数 5.7.7 过后是 60 秒,以前是 3600 秒,修改后需要重启主从才会生效。
  • 2. 如果 change master 没有指定 MASTER_HEARTBEAT_PERIOD 的情况下会设置为 slave_net_timeout/2

一般我们配置主从都没有去指定这个心跳周期,因此就是 slave_net_timeout/2,它控制的是如果在主库没有 Event 产生的情况下,多久发送一个心跳 Event 给从库的 IO 线程,用于保持连接。但是一旦我们配置了主从(change master)这个值就定下来了,不会随着 slave_net_timeout 参数的更改而更改,我们可以在 slave_master_info 表中找到相应的设置如下:

  1. mysql> select Heartbeat from slave_master_info \G

  2. *************************** 1. row ***************************

  3. Heartbeat: 30

  4. 1 row in set (0.01 sec)

如果我们要更改这个值只能重新 change master 才行。

三、原因总结

如果满足下面三个条件,将会出现案例中的故障:

  • 主从中的 MASTER_HEARTBEAT_PERIOD 的值大于从库 slave_net_timeout

  • 主库当前压力很小持续 slave_net_timeout 设置时间没有产生新的 Event

  • 之前主从有一定的延迟

那么这种情况下在主库心跳 Event 发送给从库的IO线程之前,IO 线程已经断开了。断开后 IO 线程会进行重连,每次重连将会生成新的 relay log,但是这些 relay log 由于延迟问题不能清理就出现了案例中的情况。

下面是官方文档中关于这部分说明:

  1. If you are logging master connection information to tables, MASTER_HEARTBEAT_PERIOD can be seen

  2. as the value of the Heartbeat column of the mysql.slave_master_info table.

  3. Setting interval to 0 disables heartbeats altogether. The default value for interval is equal to the

  4. value of slave_net_timeout divided by 2.

  5. Setting @@global.slave_net_timeout to a value less than that of the current heartbeat interval

  6. results in a warning being issued. The effect of issuing RESET SLAVE on the heartbeat interval is to

  7. reset it to the default value.

四、案例模拟
有了理论基础就很好了模拟了,延迟这一点我模拟的时候关闭了从库的 SQL 线程来模拟 relay log 积压的情况,因为这个案例和 SQL 线程没有太多的关系。
提前配置好主从,查看当前的心跳周期和 slave_net_timeout 参数如下:
  1. mysql> show variables like '%slave_net_timeout%';

  2. +-------------------+-------+

  3. | Variable_name | Value |

  4. +-------------------+-------+

  5. | slave_net_timeout | 60 |

  6. +-------------------+-------+

  7. 1 row in set (0.01 sec)


  8. mysql> select Heartbeat from slave_master_info \G

  9. *************************** 1. row ***************************

  10. Heartbeat: 30

  11. 1 row in set (0.00 sec)

1、停止从库的 SQL 线程

stop slave sql_thread;

2、设置 slave_net_timeout 为 10

  1. mysql> set global slave_net_timeout=10;

  2. Query OK, 0 rows affected, 1 warning (0.00 sec)


  3. mysql> show warnings;

  4. +---------+------+-----------------------------------------------------------------------------------------------------------------------------------------------------------------+

  5. | Level | Code | Message |

  6. +---------+------+-----------------------------------------------------------------------------------------------------------------------------------------------------------------+

  7. | Warning | 1704 | The requested value for the heartbeat period exceeds the value of `slave_net_timeout' seconds. A sensible value for the period should be less than the timeout. |

  8. +---------+------+-----------------------------------------------------------------------------------------------------------------------------------------------------------------+

  9. 1 row in set (0.00 sec)

可以看到这里实际上已经有一个警告了。

3、重启 IO 线程
这样才会让 slave_net_timeout 参数生效
  1. mysql> stop slave ;

  2. Query OK, 0 rows affected (0.01 sec)


  3. mysql> start slave io_thread;

  4. Query OK, 0 rows affected (0.01 sec)

4、观察现象

大概每 10 秒会生成一个 relay log 文件如下:
  1. -rw-r----- 1 mysql mysql 500 2019-09-27 23:48:32.655001361 +0800 relay.000142

  2. -rw-r----- 1 mysql mysql 500 2019-09-27 23:48:42.943001355 +0800 relay.000143

  3. -rw-r----- 1 mysql mysql 500 2019-09-27 23:48:53.293001363 +0800 relay.000144

  4. -rw-r----- 1 mysql mysql 500 2019-09-27 23:49:03.502000598 +0800 relay.000145

  5. -rw-r----- 1 mysql mysql 500 2019-09-27 23:49:13.799001357 +0800 relay.000146

  6. -rw-r----- 1 mysql mysql 500 2019-09-27 23:49:24.055001354 +0800 relay.000147

  7. -rw-r----- 1 mysql mysql 500 2019-09-27 23:49:34.280001827 +0800 relay.000148

  8. -rw-r----- 1 mysql mysql 500 2019-09-27 23:49:44.496001365 +0800 relay.000149

  9. -rw-r----- 1 mysql mysql 500 2019-09-27 23:49:54.789001353 +0800 relay.000150

  10. -rw-r----- 1 mysql mysql 500 2019-09-27 23:50:05.485001371 +0800 relay.000151

  11. -rw-r----- 1 mysql mysql 500 2019-09-27 23:50:15.910001430 +0800 relay.000152

大概每 10 秒主库的日志会输出如下日志:
  1. 2019-10-08T02:27:24.996827+08:00 217 [Note] While initializing dump thread for slave with UUID <010fde77-2075-11e9-ba07-5254009862c0>, found a zombie dump thread with the same UUID. Master is killing the zombie dump thread(216).

  2. 2019-10-08T02:27:24.998297+08:00 217 [Note] Start binlog_dump to master_thread_id(217) slave_server(953340), pos(, 4)

  3. 2019-10-08T02:27:35.265961+08:00 218 [Note] While initializing dump thread for slave with UUID <010fde77-2075-11e9-ba07-5254009862c0>, found a zombie dump thread with the same UUID. Master is killing the zombie dump thread(217).

  4. 2019-10-08T02:27:35.266653+08:00 218 [Note] Start binlog_dump to master_thread_id(218) slave_server(953340), pos(, 4)

  5. 2019-10-08T02:27:45.588074+08:00 219 [Note] While initializing dump thread for slave with UUID <010fde77-2075-11e9-ba07-5254009862c0>, found a zombie dump thread with the same UUID. Master is killing the zombie dump thread(218).

  6. 2019-10-08T02:27:45.589814+08:00 219 [Note] Start binlog_dump to master_thread_id(219) slave_server(953340), pos(, 4)

  7. 2019-10-08T02:27:55.848558+08:00 220 [Note] While initializing dump thread for slave with UUID <010fde77-2075-11e9-ba07-5254009862c0>, found a zombie dump thread with the same UUID. Master is killing the zombie dump thread(219).

  8. 2019-10-08T02:27:55.849442+08:00 220 [Note] Start binlog_dump to master_thread_id(220) slave_server(953340), pos(, 4)

这个日志就和案例中的一模一样了。
解决问题

知道原因后解决也就很简单了我们只需设置 slave_net_timeout 参数为 MASTER_HEARTBEAT_PERIOD 的 2 倍就可以了,设置后重启主从即可。

五、实现方式

这里我们将通过简单的源码调用分析来看看到底 slave_net_timeout 参数和 MASTER_HEARTBEAT_PERIOD 对主从的影响。
1、从库使用参数 slave_net_timeout

从库IO线程启动时候会通过参数 slave_net_timeout 设置超时:

  1. ->connect_to_master

  2. -> mysql_options


  3. case MYSQL_OPT_CONNECT_TIMEOUT: //MYSQL_OPT_CONNECT_TIMEOUT

  4. mysql->options.connect_timeout= *(uint*) arg;

  5. break;

而在建立和主库的连接时候会使用这个值
  1. connect_to_master

  2. ->mysql_real_connect

  3. -> get_vio_connect_timeout


  4. timeout_sec= mysql->options.connect_timeout;

因此我们也看到了 slave_net_timeout 参数只有在 IO 线程重启的时候才会生效

2、从库设置 MASTER_HEARTBEAT_PERIOD 值
在每次使用从库 change master 时候会设置这个值如下,默认为 slave_net_timeout/2:
  1. ->change_master

  2. ->change_receive_options


  3. mi->heartbeat_period= min<float>(SLAVE_MAX_HEARTBEAT_PERIOD,

  4. (slave_net_timeout/2.0f));

因此我们看到只有 change master 才会重新设置这个值,重启主从是不会重新设置的。

3、使用 MASTER_HEARTBEAT_PERIOD 值

每次 IO 线程启动时候会将这个值传递给主库的 DUMP 线程,方式应该是通过构建语句 SET @masterheartbeatperiod 来完成的。如下:
  1. ->handle_slave_io

  2. ->get_master_version_and_clock


  3. if (mi->heartbeat_period != 0.0)

  4. {

  5. char llbuf[22];

  6. const char query_format[]= "SET @master_heartbeat_period= %s";

  7. char query[sizeof(query_format) - 2 + sizeof(llbuf)];

主库启动 DUMP 线程的时候会通过搜索的方式找到这个值如下
  1. ->Binlog_sender::init

  2. ->Binlog_sender::init_heartbeat_period


  3. user_var_entry *entry=

  4. (user_var_entry*) my_hash_search(&m_thd->user_vars, (uchar*) name.str,

  5. name.length);

  6. m_heartbeat_period= entry ? entry->val_int(&null_value) : 0;

4、DUMP 线程使用 MASTER_HEARTBEAT_PERIOD 发送心跳 Event
这里主要是通过一个超时等待来完成,如下:
  1. ->Binlog_sender::wait_new_events

  2. ->Binlog_sender::wait_with_heartbeat


  3. set_timespec_nsec(&ts, m_heartbeat_period); //心跳超时

  4. ret= mysql_bin_log.wait_for_update_bin_log(m_thd, &ts);//等待

  5. if (ret != ETIMEDOUT && ret != ETIME) //如果是正常收到则收到信号,说明有新的Event到来,否则如果是超时则发送心跳Event

  6. break; //正常返回0 是超时返回ETIMEDOUT 继续循环


  7. if (send_heartbeat_event(log_pos)) //发送心跳Event

  8. return 1;

5、重连会杀掉可能的存在的 DUMP 线程
根据 UUID 进行比对如下:
  1. ->kill_zombie_dump_threads


  2. Find_zombie_dump_thread find_zombie_dump_thread(slave_uuid);

  3. THD *tmp= Global_THD_manager::get_instance()->

  4. find_thd(&find_zombie_dump_thread);

  5. if (tmp)

  6. {

  7. /*

  8. Here we do not call kill_one_thread() as

  9. it will be slow because it will iterate through the list

  10. again. We just to do kill the thread ourselves.

  11. */

  12. if (log_warnings > 1)

  13. {

  14. if (slave_uuid.length())

  15. {

  16. sql_print_information("While initializing dump thread for slave with "

  17. "UUID <%s>, found a zombie dump thread with the "

  18. "same UUID. Master is killing the zombie dump "

  19. "thread(%u).", slave_uuid.c_ptr(),

  20. tmp->thread_id());

  21. }//这里就是本案例中的日志了

  22. .....

这里我们看到了案例中的日志。


6、关于 DUMP 线程流程图

最后给出一张来自我《 MySQL 主从原理 32 讲》第 17 节中 DUMP 线程的流程图如下:

最后推荐高鹏的专栏《深入理解 MySQL 主从原理 32 讲》,想要透彻了解学习 MySQL 主从原理的朋友不容错过。

作者微信:gp_22389860

社区近期动态

No.1

10.26 DBLE 用户见面会 北京站

爱可生开源社区将在 2019 年 10 月 26 日迎来在北京的首场 DBLE 用户见面会,以线下互动分享的会议形式跟大家见面。

时间:10月26日 9:00 – 12:00 AM

地点:HomeCafe 上地店(北京市海淀区上地二街一号龙泉湖酒店对面)


重要提醒:

1. 同日下午还有 dbaplus 社群举办的沙龙:聚焦数据中台、数据架构与优化。

2. 爱可生开源社区会在每年10.24日开源一款高质量产品。本次在 dbaplus 沙龙会议上,爱可生的资深研发工程师闫阿龙,将为大家带来《金融分布式事务实践及txle概述》,并在现场开源。

No.2

「3306π」成都站 Meetup

知数堂将在 2019 年 10 月 26 日在成都举办线下会议,本次会议中邀请了五位数据库领域的资深研发/DBA进行主题分享。

时间:2019年10月26日 13:00-18:00

地点:成都市高新区天府三街198号腾讯成都大厦A座多功能厅

No.3

Mycat 问题免费诊断

诊断范围支持:

Mycat 的故障诊断、源码分析、性能优化

服务支持渠道:

  1. 技术交流群,进群后可提问

    QQ群(669663113)

  2. 社区通道,邮件&电话

    osc@actionsky.com

  3. 现场拜访,线下实地,1天免费拜访

关注“爱可生开源社区”公众号,回复关键字“Mycat”,获取活动详情。

No.4

社区技术内容征稿

征稿内容:

  1. 格式:.md/.doc/.txt

  2. 主题:MySQL、分布式中间件DBLE、数据传输组件DTLE相关技术内容

  3. 要求:原创且未发布过

  4. 奖励:作者署名;200元京东E卡+社区周边

投稿方式:

  1. 邮箱:osc@actionsky.com

  2. 格式:[投稿]姓名+文章标题

  3. 以附件形式发送,正文需注明姓名、手机号、微信号,以便小编及时联系