作者简介
路路,热爱技术、乐于分享的技术人,目前主要从事数据库相关技术的研究。
schema.xml 配置文件里面的配置结构,如下为 DBLE 后端连接池的模块结构图(来源于 DBLE 官方文档):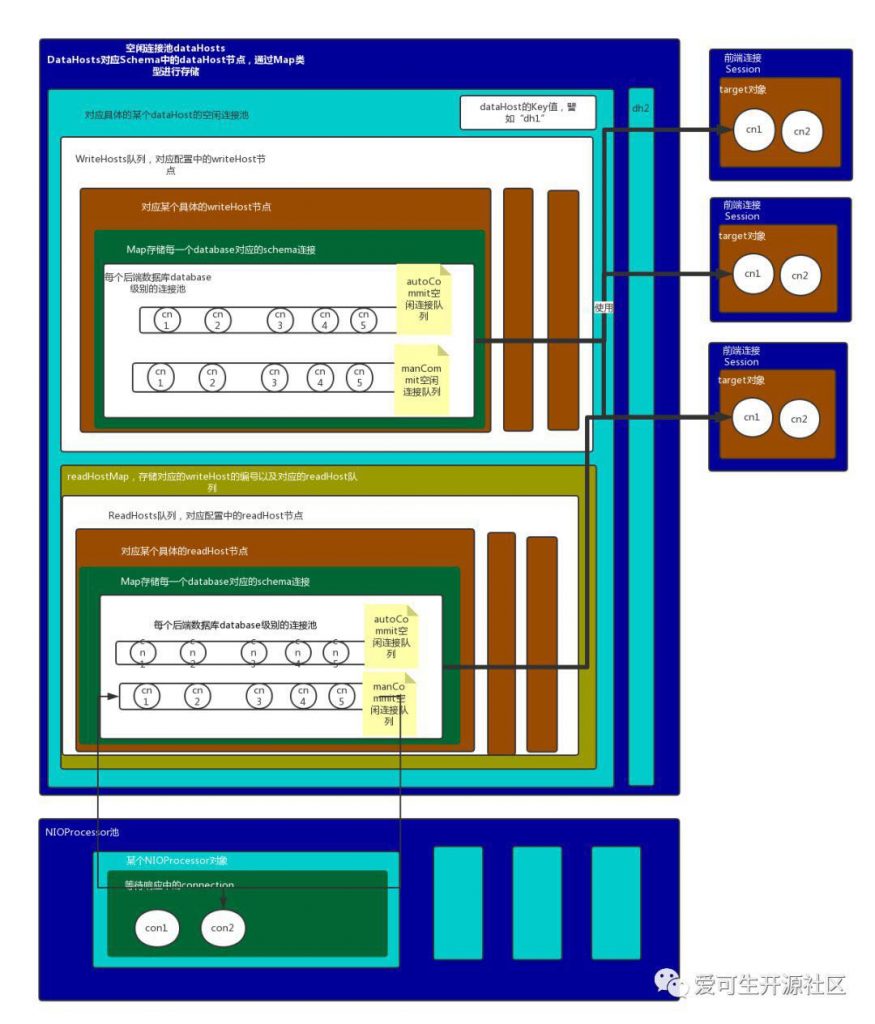
对照后端连接池模块的结构图,我们再来看下 schema.xml 配置文件:
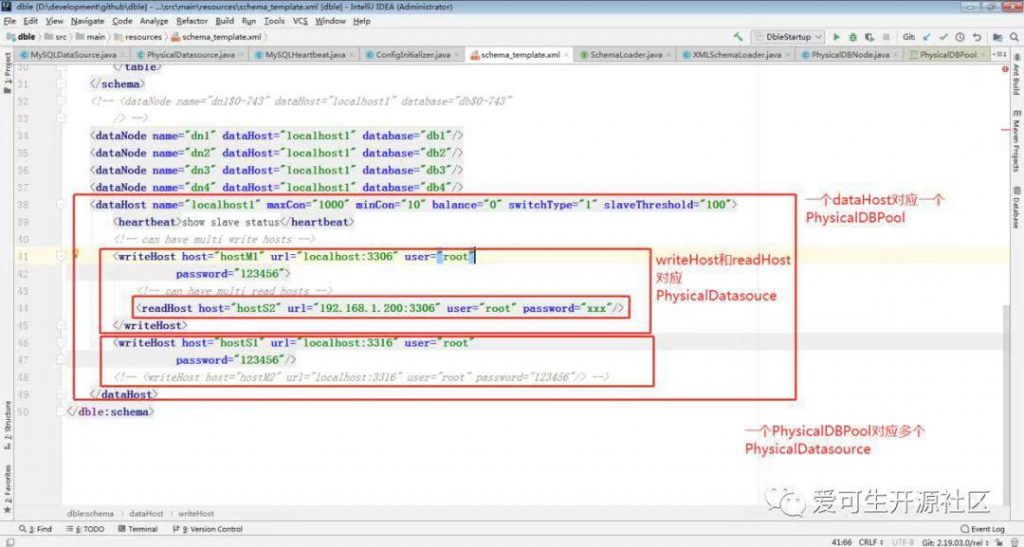
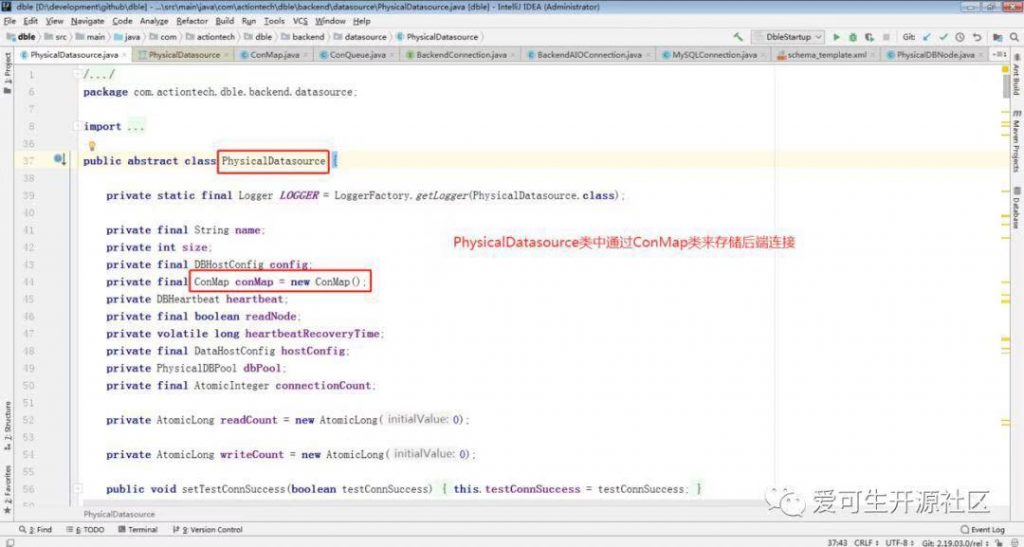
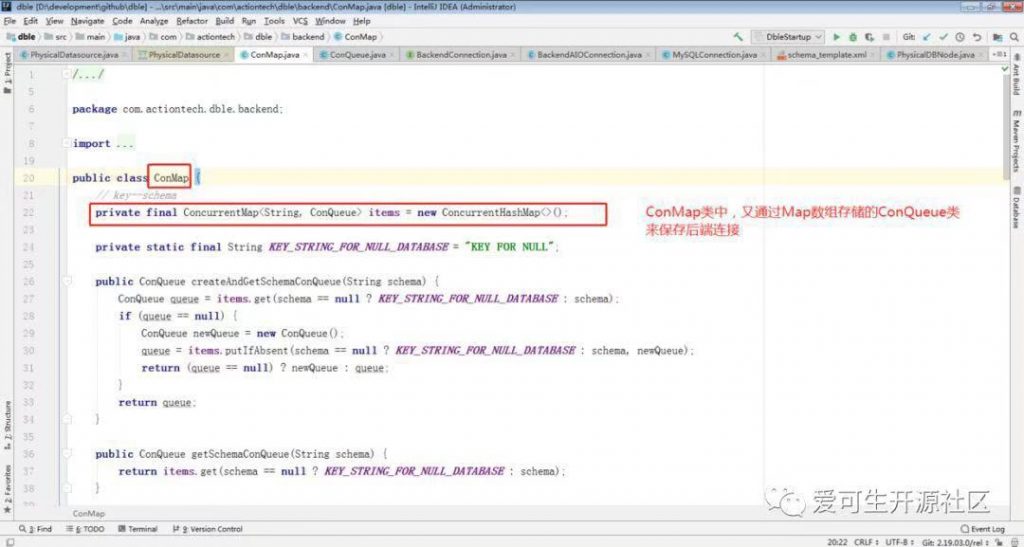
上图中将配置文件中的主要结构与相关的类对应起来了,后续源码阅读也将主要从这几个类展开。继续看下连接池相关类的关系:

schema.xml 配置文件中所展示的一样。
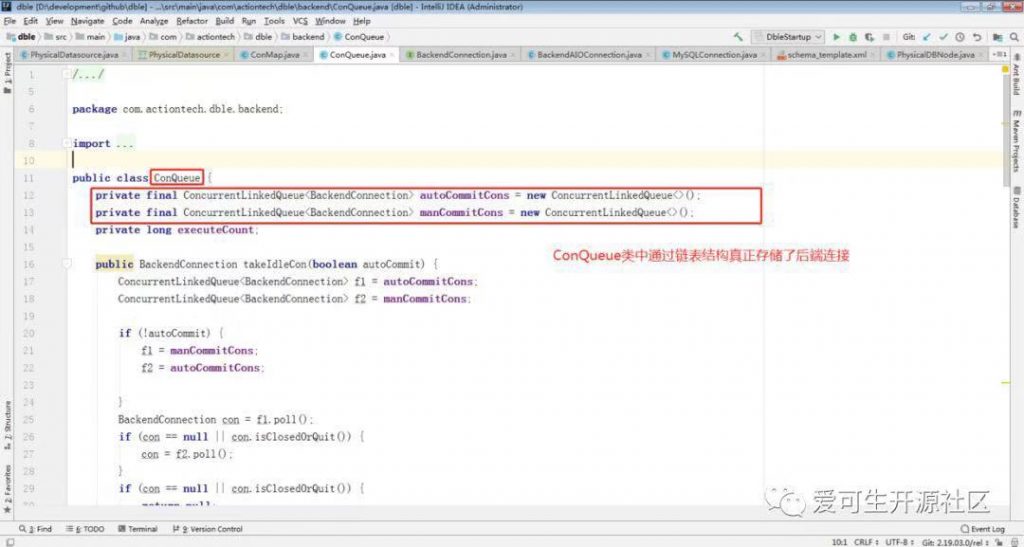
ConMap#tryTakeCon 中:
public BackendConnection tryTakeCon(final String schema, boolean autoCommit) {
        final ConQueue queue = items.get(schema == null ? KEY_STRING_FOR_NULL_DATABASE : schema);        BackendConnection con = null;        if (queue != null) {            con = tryTakeCon(queue, autoCommit);        }        if (con != null) {            return con;        } else {            for (ConQueue queue2 : items.values()) {                if (queue != queue2) {                    con = tryTakeCon(queue2, autoCommit);                    if (con != null) {                        return con;                    }                }            }        }        return null;
    }
    private BackendConnection tryTakeCon(ConQueue queue, boolean autoCommit) {
        BackendConnection con;        if (queue != null && ((con = queue.takeIdleCon(autoCommit)) != null)) {            return con;        } else {            return null;        }    }
MySQLConnection 类为具体的 MySQL 连接对象, synAndDoExecute 方法则判断获取到的连接是否符合要求,若不符合要求,先同步状态,然后执行具体的SQL。DbleServer#startup方法中相关代码如下:
public void startup() throws IOException {
this.config = new ServerConfig();
……
}
继续看 ServerConfig 类的构造方法:
public ServerConfig() {
//创建连接池的逻辑在这一行代码
ConfigInitializer confInit = new ConfigInitializer(true, false);
this.system = confInit.getSystem();
this.users = confInit.getUsers();
this.schemas = confInit.getSchemas();
/*
初始化后的 datahost 数据结构存储在 ServerConfig 类的dataHosts:Map<String, PhysicalDBPool>变量中,其中 key 值为 schema.xml 中配置的 dataHost 的 name 值
*/
this.dataHosts = confInit.getDataHosts();
/*
初始化后的 datanode 数据结构存储在 ServerConfig 类的dataNodes :Map<String, PhysicalDBNode>变量中,其中key值为 schema.xml 中配置的 datanode 的 name 值
*/
this.dataNodes = confInit.getDataNodes();
this.erRelations = confInit.getErRelations();
this.dataHostWithoutWR = confInit.isDataHostWithoutWH();
ConfigUtil.setSchemasForPool(dataHosts, dataNodes);
……
}
ConfigInitializer 类的构造方法:
public ConfigInitializer(boolean loadDataHost, boolean lowerCaseNames) {
//load server.xml
XMLServerLoader serverLoader = new XMLServerLoader(this);
//load rule.xml and schema.xml
SchemaLoader schemaLoader = new XMLSchemaLoader(lowerCaseNames, this);
//下面这两个方法分别初始化了 dataHosts:Map<String, PhysicalDBPool>和dataNodes:Map<String, PhysicalDBNode>变量
this.dataHosts = initDataHosts(schemaLoader);
this.dataNodes = initDataNodes(schemaLoader);
}
ConfigInitializer#initDataHosts 和 ConfigInitializer#initDataNodes 这两个方法:
//这里即根据配置文件生成相应的 Map 结构
private Map<String, PhysicalDBPool> initDataHosts(SchemaLoader schemaLoader) {
Map<String, DataHostConfig> nodeConf = schemaLoader.getDataHosts();
//create PhysicalDBPool according to DataHost
Map<String, PhysicalDBPool> nodes = new HashMap<>(nodeConf.size());
for (DataHostConfig conf : nodeConf.values()) {
//create PhysicalDBPool
PhysicalDBPool pool = getPhysicalDBPool(conf);
nodes.put(pool.getHostName(), pool);
}
return nodes;
}
//这里也是根据配置文件生成相应的 Map 结构
private Map<String, PhysicalDBNode> initDataNodes(SchemaLoader schemaLoader) {
Map<String, DataNodeConfig> nodeConf = schemaLoader.getDataNodes();
Map<String, PhysicalDBNode> nodes = new HashMap<>(nodeConf.size());
for (DataNodeConfig conf : nodeConf.values()) {
//PhysicalDBNode 类里存放了 PhysicalDBPool 类的引用
PhysicalDBPool pool = this.dataHosts.get(conf.getDataHost());
if (pool == null) {
throw new ConfigException("dataHost not exists " + conf.getDataHost());
}
PhysicalDBNode dataNode = new PhysicalDBNode(conf.getName(), conf.getDatabase(), pool);
nodes.put(dataNode.getName(), dataNode);
}
return nodes;
}
到这里,后端连接相关的数据结构都已经初始化完成了(注意这里只是创建了相应的数据结构,里面还没有存放实际的后端MySQL连接),我们看到有 PhysicalDBPool 类和 PhysicalDBNode 类, PhysicalDBNode是 DBLE 分片(Datanode)的对应,引用一个连接池对象 PhysicalDBPool , PhysicalDBPool 里面引用了真正的连接池对象 PhysicalDatasource,并且按照读节点和写节点分开引用,实现读写分类和节点切换的功能。
这两个类的关系可以看一下类图:

PhysicalDBNode 类关联了 PhysicalDBPool 类,即对应每个 datanode 关联一个 datahost 连接池。DbleServer#startup 方法中:
public void startup() throws IOException {
……
//关键代码在这一行(光看方法名真是不知道这个创建后端连接的方法)
pullVarAndMeta();
……
DbleServer#pullVarAndMeta 方法:
private void pullVarAndMeta() throws IOException {
……
//直接看关键代码,是下面这个方法进行初始化连接池的操作
initDataHost();
……
DbleServer#initDataHost 方法:
private void initDataHost() {
// init datahost
Map<String, PhysicalDBPool> dataHosts = this.getConfig().getDataHosts();
LOGGER.info("Initialize dataHost ...");
//下面的代码便是根据配置文件里的 datahosts 开始遍历初始化相应的连接池了
for (PhysicalDBPool node : dataHosts.values()) {
//这里的 index 为配置多个 writehost 的时候,默认初始化哪一个,默认是 0,即第一个配置的 writehost
String index = dnIndexProperties.getProperty(node.getHostName(), "0");
if (!"0".equals(index)) {
LOGGER.info("init datahost: " + node.getHostName() + " to use datasource index:" + index);
}
//初始化连接池的方法
node.init(Integer.parseInt(index));
node.startHeartbeat();
}
}
PhysicalDBPool#init 方法:
public int init(int index) {        if (!checkIndex(index)) {            index = 0;        }
        for (int i = 0; i < writeSources.length; i++) {            int j = loop(i + index);            //initSource() 方法中初始化了连接池            if (initSource(j, writeSources[j])) {                //activedIndex 表明了当前是哪个写节点的数据源在生效                activeIndex = j;                initSuccess = true;                LOGGER.info(getMessage(j, " init success"));                return activeIndex;            }        }
        initSuccess = false;        LOGGER.warn(hostName + " init failure");        return -1;    }
PhysicalDBPool#initSource 方法:
private boolean initSource(int index, PhysicalDatasource ds) {        if (ds.getConfig().isDisabled()) {            LOGGER.info(ds.getConfig().getHostName() + " is disabled, skipped");            return true;        }        //获取 datasource 的最小连接数,从这里也可以看出来,datahost 里配置的最小连接数范围针对下面配置的写节点、读节点        int initSize = ds.getConfig().getMinCon();        //最小连接数不能小于对应数据源的数据库 schema 数+1        if (initSize < this.schemas.length + 1) {            initSize = this.schemas.length + 1;            LOGGER.warn("minCon size is less than (the count of schema +1), so dble will create at least 1 conn for every schema and an empty schema conn");        }        //最大连接数不能小于最小连接数的判断        if (ds.getConfig().getMaxCon() < initSize) {            ds.getConfig().setMaxCon(initSize);            ds.setSize(initSize);            LOGGER.warn("maxCon is less than the initSize of dataHost:" + initSize + " change the maxCon into " + initSize);        }
        LOGGER.info("init backend mysql source ,create connections total " + initSize + " for " + ds.getName() +                " index :" + index);        //存放创建好的连接的数据结构        CopyOnWriteArrayList<BackendConnection> list = new CopyOnWriteArrayList<>();        //连接池初始化完成后的回调函数,后面会详细分析        GetConnectionHandler getConHandler = new GetConnectionHandler(list, initSize);        boolean hasConnectionInPool = false;        try {            //这里是初始化schema为null的一条连接            if (ds.getTotalConCount() <= 0) {                ds.initMinConnection(null, true, getConHandler, null);            } else {                LOGGER.info("connection with null schema do not create,because testConnection in pool");                getConHandler.initIncrement();                hasConnectionInPool = true;            }        } catch (Exception e) {            LOGGER.warn("init connection with schema null error", e);        }        //根据初始化连接池大小,正式初始化连接池中的连接        for (int i = 0; i < initSize - 1; i++) {            try {                //PhysicalDataSource#initMinConnection方法为初始化单条后端连接的方法                ds.initMinConnection(this.schemas[i % schemas.length], true, getConHandler, null);            } catch (Exception e) {                LOGGER.warn(getMessage(index, " init connection error."), e);            }        }

        long timeOut = System.currentTimeMillis() + 60 * 1000;
        //等待所有初始化连接创建完成        while (!getConHandler.finished() && (System.currentTimeMillis() < timeOut)) {            try {                Thread.sleep(100);            } catch (InterruptedException e) {                /*                 * hardly triggered no error is needed                 */                LOGGER.info("initError", e);            }        }        LOGGER.info("init result :" + getConHandler.getStatusInfo());        return !list.isEmpty() || hasConnectionInPool;    }
PhysicalDataSource#initMinConnection 方法为初始化单条后端连接的方法,继续查看该代码:
public void initMinConnection(String schema, boolean autocommit, final ResponseHandler handler,
final Object attachment) throws IOException {
LOGGER.info("create new connection for " +
this.name + " of schema " + schema);
//先判断是否还需创建新连接,防止创建连接过多
if (this.createNewCount()) {
//继续调用createNewConnection方法
createNewConnection(handler, attachment, schema);
}
}
PhysicalDataSource#createNewConnection方法:
private void createNewConnection(final ResponseHandler handler, final Object attachment,                                     final String schema) throws IOException {        // 这里是异步创建连接        DbleServer.getInstance().getComplexQueryExecutor().execute(new Runnable() {            public void run() {                try {                    //继续调用了createNewConnection方法,并且这里定义了内部类DelegateResponseHandler,注意这里的handler变量代表的是哪个类还记得吗?提醒一下大家这里是GetConnectionHandler类,这么多层调用很容易被搞迷糊了。                    createNewConnection(new DelegateResponseHandler(handler) {                        @Override                        public void connectionError(Throwable e, BackendConnection conn) {                            Map<String, String> labels = AlertUtil.genSingleLabel("data_host", hostConfig.getName() + "-" + config.getHostName());                            AlertUtil.alert(AlarmCode.CREATE_CONN_FAIL, Alert.AlertLevel.WARN, "createNewConn Error" + e.getMessage(), "mysql", config.getId(), labels);                            ToResolveContainer.CREATE_CONN_FAIL.add(hostConfig.getName() + "-" + config.getHostName());                            handler.connectionError(e, conn);                        }
                        @Override                        public void connectionAcquired(BackendConnection conn) {                            takeCon(conn, handler, attachment, schema);                        }                    }, schema);                } catch (IOException e) {                    handler.connectionError(e, null);                }            }        });    }
PhysicalDatasource#createNewConnection 方法是个抽象方法:
public abstract void createNewConnection(ResponseHandler handler, String schema) throws IOException;
具体实现看 MySQLDataSource#createNewConnection 方法:
//这里调用了 MySQLConnectionFactory#make 方法创建连接
public void createNewConnection(ResponseHandler handler, String schema) throws IOException {
//注意这里的 handler为DelegateResponseHandler,即在PhysicalDataSource#createNewConnection方法里定义的匿名内部类
factory.make(this, handler, schema);
}
MySQLConnectionFactory#make 我们也来看一下,这个方法涉及到网络方面了,我们都知道Dble的连接用了reactor设计模式,这里网络io层面我们就不再深入了,我们只需要知道连接通过网络建立之后,回调了哪个方法就行:
public MySQLConnection make(MySQLDataSource pool, ResponseHandler handler,                                String schema) throws IOException {
        DBHostConfig dsc = pool.getConfig();        NetworkChannel channel = openSocketChannel(DbleServer.getInstance().isAIO());
        MySQLConnection c = new MySQLConnection(channel, pool.isReadNode(), schema == null);        c.setSocketParams(false);        c.setHost(dsc.getIp());        c.setPort(dsc.getPort());        c.setUser(dsc.getUser());        c.setPassword(dsc.getPassword());        c.setSchema(schema);        //这里是连接建立后的回调类MySQLConnectionAuthenticator,注意这里的handler变量为PhysicalDataSource#createNewConnection方法里定义的匿名内部类DelegateResponseHandler        c.setHandler(new MySQLConnectionAuthenticator(c, handler));        c.setPool(pool);        c.setIdleTimeout(pool.getConfig().getIdleTimeout());        if (channel instanceof AsynchronousSocketChannel) {            ((AsynchronousSocketChannel) channel).connect(                    new InetSocketAddress(dsc.getIp(), dsc.getPort()), c,                    (CompletionHandler) DbleServer.getInstance().getConnector());        } else {            ((NIOConnector) DbleServer.getInstance().getConnector()).postConnect(c);        }        return c;    }
MySQLConnectionAuthenticator#handle 方法:
public void handle(byte[] data) {
……
//省略不相关的代码,在后端连接建立成功后,会直接调用PhysicalDataSource#createNewConnection方法里定义的匿名内部类的connectionAcquired方法
listener.connectionAcquired(source);
……
}
PhysicalDataSource#createNewConnection 方法:
private void createNewConnection(final ResponseHandler handler, final Object attachment,
final String schema) throws IOException {
// aysn create connection
DbleServer.getInstance().getComplexQueryExecutor().execute(new Runnable() {
public void run() {
try {
createNewConnection(new DelegateResponseHandler(handler) {
@Override
public void connectionError(Throwable e, BackendConnection conn) {
Map<String, String> labels = AlertUtil.genSingleLabel("data_host", hostConfig.getName() + "-" + config.getHostName());
AlertUtil.alert(AlarmCode.CREATE_CONN_FAIL, Alert.AlertLevel.WARN, "createNewConn Error" + e.getMessage(), "mysql", config.getId(), labels);
ToResolveContainer.CREATE_CONN_FAIL.add(hostConfig.getName() + "-" + config.getHostName());
handler.connectionError(e, conn);
}
//回调的是这里的方法,这里的 handler 还记得吗?别忘了是 GetConnectionHandler 类
@Override
public void connectionAcquired(BackendConnection conn) {
takeCon(conn, handler, attachment, schema);
}
}, schema);
} catch (IOException e) {
handler.connectionError(e, null);
}
}
});
}
PhysicalDatasource#takeCon 方法:
private void takeCon(BackendConnection conn,
final ResponseHandler handler, final Object attachment,
String schema) {
if (ToResolveContainer.CREATE_CONN_FAIL.contains(this.getHostConfig().getName() + "-" + this.getConfig().getHostName())) {
Map<String, String> labels = AlertUtil.genSingleLabel("data_host", this.getHostConfig().getName() + "-" + this.getConfig().getHostName());
AlertUtil.alertResolve(AlarmCode.CREATE_CONN_FAIL, Alert.AlertLevel.WARN, "mysql", this.getConfig().getId(), labels,
ToResolveContainer.CREATE_CONN_FAIL, this.getHostConfig().getName() + "-" + this.getConfig().getHostName());
}
//这个方法是创建连接所属schema的连接队列
takeCon(conn, schema);
conn.setAttachment(attachment);
//调用了GetConnectionHandler类的connectionAcquired方法
handler.connectionAcquired(conn);
}
GetConnectionHandler#connectionAcquired方法(这个变量从传入到现在,终于用上了):
public void connectionAcquired(BackendConnection conn) {
//将成功创建的连接放入成功连接列表
successCons.add(conn);
finishedCount.addAndGet(1);
LOGGER.info("connected successfully " + conn);
//重点!这里便是将新建的连接放入连接池的方法
conn.release();
}
继续看 MySQLConnection#release 方法:
public void release() {
……
complexQuery = false;
metaDataSynced = true;
attachment = null;
statusSync = null;
modifiedSQLExecuted = false;
isDDL = false;
testing = false;
setResponseHandler(null);
setSession(null);
logResponse.set(false);
//这里真正将连接放入连接池,该方法为`PhysicalDatasource#releaseChannel`方法
pool.releaseChannel(this);
}
PhysicalDatasource#releaseChannel 方法:
public void releaseChannel(BackendConnection c) {
if (LOGGER.isDebugEnabled()) {
LOGGER.debug("release channel " + c);
}
//将连接放入连接池
returnCon(c);
}
PhysicalDatasource#returnCon 方法:
private void returnCon(BackendConnection c) {        if (c.isClosedOrQuit()) {            return;        }        c.setAttachment(null);        c.setBorrowed(false);        c.setLastTime(TimeUtil.currentTimeMillis());
        String errMsg = null;
        boolean ok;        //根据连接的schema获取到ConQueue连接队列        ConQueue queue = this.conMap.createAndGetSchemaConQueue(c.getSchema());        //判断连接是自动提交还是手动提交,将连接放入相应的队列中        if (c.isAutocommit()) {            ok = queue.getAutoCommitCons().offer(c);        } else {            ok = queue.getManCommitCons().offer(c);        }        if (!ok) {            errMsg = "can't return to pool ,so close con " + c;        }        if (errMsg != null) {            LOGGER.info(errMsg);            c.close(errMsg);        }    }
SingleNodeHandler#execute 方法中:
public void execute() throws Exception {        connClosed = false;        this.packetId = (byte) session.getPacketId().get();        //这里是先判断会话有没有取过连接,如果有的话就不再取        if (session.getTargetCount() > 0) {            BackendConnection conn = session.getTarget(node);            if (conn == null && rrs.isGlobalTable() && rrs.getGlobalBackupNodes() != null) {                for (String dataNode : rrs.getGlobalBackupNodes()) {                    RouteResultsetNode tmpNode = new RouteResultsetNode(dataNode, rrs.getSqlType(), rrs.getStatement());                    conn = session.getTarget(tmpNode);                    if (conn != null) {                        break;                    }                }            }            node.setRunOnSlave(rrs.getRunOnSlave());            if (session.tryExistsCon(conn, node)) {                execute(conn);                return;            }        }
        // 我们重点看下获取新连接的逻辑        node.setRunOnSlave(rrs.getRunOnSlave());        ServerConfig conf = DbleServer.getInstance().getConfig();        PhysicalDBNode dn = conf.getDataNodes().get(node.getName());        //PhysicalDBNode有相应PhysicalDBPool类的引用,这里调用了PhysicalDBNode#getConnection方法获取连接        dn.getConnection(dn.getDatabase(), session.getSource().isTxStart(), session.getSource().isAutocommit(), node, this, node);    }
PhysicalDBNode#getConnection 方法:
public void getConnection(String schema, boolean isMustWrite, boolean autoCommit, RouteResultsetNode rrs,
ResponseHandler handler, Object attachment) throws Exception {
//判断是否必须走写节点
if (isMustWrite) {
//获取写节点的连接
getWriteNodeConnection(schema, autoCommit, handler, attachment);
return;
}
if (rrs.getRunOnSlave() == null) {
if (rrs.canRunINReadDB(autoCommit)) {
dbPool.getRWBalanceCon(schema, autoCommit, handler, attachment);
} else {
getWriteNodeConnection(schema, autoCommit, handler, attachment);
}
} else {
if (rrs.getRunOnSlave()) {
if (!dbPool.getReadCon(schema, autoCommit, handler, attachment)) {
LOGGER.info("Do not have slave connection to use, use master connection instead.");
rrs.setRunOnSlave(false);
rrs.setCanRunInReadDB(false);
getWriteNodeConnection(schema, autoCommit, handler, attachment);
}
} else {
rrs.setCanRunInReadDB(false);
getWriteNodeConnection(schema, autoCommit, handler, attachment);
}
}
}
PhysicalDBNode#getWriteNodeConnection 方法:
private void getWriteNodeConnection(String schema, boolean autoCommit, ResponseHandler handler, Object attachment) throws IOException {
checkRequest(schema);
if (dbPool.isInitSuccess()) {
PhysicalDatasource writeSource = dbPool.getSource();
if (writeSource.getConfig().isDisabled()) {
throw new IllegalArgumentException("[" + writeSource.getHostConfig().getName() + "." + writeSource.getConfig().getHostName() + "] is disabled");
}
writeSource.setWriteCount();
//调用了PhysicalDatasource类的getConnection方法获取连接
writeSource.getConnection(schema, autoCommit, handler, attachment);
} else {
throw new IllegalArgumentException("Invalid DataSource:" + dbPool.getActiveIndex());
}
}
PhysicalDatasource#getConnection 方法:
public void getConnection(String schema, boolean autocommit, final ResponseHandler handler,                              final Object attachment) throws IOException {        /*             这里获取连接有两种情况:                1.从上述创建的连接池中获取;                2.新建连接。        */        //1.从连接池中获取连接        BackendConnection con = this.conMap.tryTakeCon(schema, autocommit);        if (con != null) {            takeCon(con, handler, attachment, schema);        } else {            if (!this.createNewCount()) {                String maxConError = "the max active Connections size can not be max than maxCon for data host[" + this.getHostConfig().getName() + "." + this.getName() + "]";                LOGGER.warn(maxConError);                Map<String, String> labels = AlertUtil.genSingleLabel("data_host", this.getHostConfig().getName() + "-" + this.getConfig().getHostName());                AlertUtil.alert(AlarmCode.REACH_MAX_CON, Alert.AlertLevel.WARN, maxConError, "dble", this.getConfig().getId(), labels);                ToResolveContainer.REACH_MAX_CON.add(this.getHostConfig().getName() + "-" + this.getConfig().getHostName());                throw new IOException(maxConError);            } else { //  2.新建连接                if (ToResolveContainer.REACH_MAX_CON.contains(this.getHostConfig().getName() + "-" + this.getConfig().getHostName())) {                    Map<String, String> labels = AlertUtil.genSingleLabel("data_host", this.getHostConfig().getName() + "-" + this.getConfig().getHostName());                    AlertUtil.alertResolve(AlarmCode.REACH_MAX_CON, Alert.AlertLevel.WARN, "dble", this.getConfig().getId(), labels,                            ToResolveContainer.REACH_MAX_CON, this.getHostConfig().getName() + "-" + this.getConfig().getHostName());
                }                LOGGER.info("no idle connection in pool,create new connection for " + this.name + " of schema " + schema);                createNewConnection(handler, attachment, schema);            }        }    }
public BackendConnection tryTakeCon(final String schema, boolean autoCommit) {
        final ConQueue queue = items.get(schema == null ? KEY_STRING_FOR_NULL_DATABASE : schema);        BackendConnection con = null;        if (queue != null) {            con = tryTakeCon(queue, autoCommit);        }        if (con != null) {            return con;        } else {            for (ConQueue queue2 : items.values()) {                if (queue != queue2) {                    con = tryTakeCon(queue2, autoCommit);                    if (con != null) {                        return con;                    }                }            }        }        return null;
    }
    private BackendConnection tryTakeCon(ConQueue queue, boolean autoCommit) {
        BackendConnection con;        if (queue != null && ((con = queue.takeIdleCon(autoCommit)) != null)) {            return con;        } else {            return null;        }    }
private void takeCon(BackendConnection conn,
final ResponseHandler handler, final Object attachment,
String schema) {
if (ToResolveContainer.CREATE_CONN_FAIL.contains(this.getHostConfig().getName() + "-" + this.getConfig().getHostName())) {
Map<String, String> labels = AlertUtil.genSingleLabel("data_host", this.getHostConfig().getName() + "-" + this.getConfig().getHostName());
AlertUtil.alertResolve(AlarmCode.CREATE_CONN_FAIL, Alert.AlertLevel.WARN, "mysql", this.getConfig().getId(), labels,
ToResolveContainer.CREATE_CONN_FAIL, this.getHostConfig().getName() + "-" + this.getConfig().getHostName());
}
//这里仅做连接的一些状态记录
takeCon(conn, schema);
conn.setAttachment(attachment);
//这里的handler为SingleNodeHandler类(别忘了我们是一路从SingleNodeHandler类走过来的)
handler.connectionAcquired(conn);
}
public void connectionAcquired(final BackendConnection conn) {
//将后端连接与会话绑定,后续如果再用连接的话,则可以直接取出
session.bindConnection(node, conn);
//获取连接后,就是执行具体的sql了
execute(conn);
}
从连接池中获取连接的过程如上所述,流程还是比较清晰的。
//新建连接主要方法
private void createNewConnection(final ResponseHandler handler, final Object attachment,
final String schema) throws IOException {
// aysn create connection
DbleServer.getInstance().getComplexQueryExecutor().execute(new Runnable() {
public void run() {
try {
createNewConnection(new DelegateResponseHandler(handler) {
@Override
public void connectionError(Throwable e, BackendConnection conn) {
Map<String, String> labels = AlertUtil.genSingleLabel("data_host", hostConfig.getName() + "-" + config.getHostName());
AlertUtil.alert(AlarmCode.CREATE_CONN_FAIL, Alert.AlertLevel.WARN, "createNewConn Error" + e.getMessage(), "mysql", config.getId(), labels);
ToResolveContainer.CREATE_CONN_FAIL.add(hostConfig.getName() + "-" + config.getHostName());
handler.connectionError(e, conn);
}
@Override
public void connectionAcquired(BackendConnection conn) {
//这里的handler为SingleNodeHandler,新建连接成功后,将回调此处代码
takeCon(conn, handler, attachment, schema);
}
}, schema);
} catch (IOException e) {
handler.connectionError(e, null);
}
}
});
}
PhysicalDataSource#takecon 方法中,在此处为调用了 SingleNodeHandler#connectionAcquired 方法:
private void takeCon(BackendConnection conn,
final ResponseHandler handler, final Object attachment,
String schema) {
……
//调用了SingleNodeHandler#connectionAcquired方法
handler.connectionAcquired(conn);
}
SingleNodeHandler#connectionAcquired 方法:
//与从连接池中获取连接的操作一样,先是绑定连接到会话,然后具体执行 SQL
public void connectionAcquired(final BackendConnection conn) {
session.bindConnection(node, conn);
execute(conn);
}
连接的获取流程到这里应该也已经清楚了。
public void okResponse(byte[] data, BackendConnection conn) {
……
//删除掉多余代码,重点看下面这一行代码,这一行代码便是将新建的连接放回连接池的代码了
session.releaseConnectionIfSafe(conn, false);
……
}
}
将新建连接放入连接池的具体代码在 NonBlockingSession#releaseConnectionIfSafe 方法中,其实还是调用的上述初始化连接池过程中将连接放入连接池中的代码,所以这里不再赘述了。
本文先介绍了 DBLE 数据库中间件的后端连接的设计思想、后端连接的数据结构,然后从源码角度详细走读了连接的创建以及获取过程,代码中涉及到很多的异步调用,不小心就会把人搞晕。连接模块对于理解数据库中间件很重要,而且连接出现问题通常都是很难排查的,希望通过本文能帮助大家理解 DBLE 的后端连接模块。后续如果忘记相应的逻辑,还可以回过头翻阅一下。
社区近期动态
No.1
Mycat 问题免费诊断
诊断范围支持:
Mycat 的故障诊断、源码分析、性能优化
服务支持渠道:
技术交流群,进群后可提问
QQ群(669663113)
社区通道,邮件&电话
osc@actionsky.com
现场拜访,线下实地,1天免费拜访
关注“爱可生开源社区”公众号,回复关键字“Mycat”,获取活动详情。
No.2
社区技术内容征稿
征稿内容:
格式:.md/.doc/.txt
主题:MySQL、分布式中间件DBLE、数据传输组件DTLE相关技术内容
要求:原创且未发布过
奖励:作者署名;200元京东E卡+社区周边
投稿方式:
邮箱:osc@actionsky.com
格式:[投稿]姓名+文章标题
以附件形式发送,正文需注明姓名、手机号、微信号,以便小编及时联系