作者:姚远
专注于 Oracle、MySQL 数据库多年,Oracle 10G 和 12C OCM,MySQL 5.6,5.7,8.0 OCP。现在鼎甲科技任技术顾问,为同事和客户提供数据库培训和技术支持服务。
前言
MySQL 的 Binlog 记录着 MySQL 数据库的所有变更信息,了解 Binlog 的结构可以帮助我们解析Binlog,甚至对 Binlog 进行一些修改,或者说是“篡改”,例如实现类似于 Oracle 的 flashback 的功能,恢复误删除的记录,把 update 的记录再还原回去等。本文将带您探讨一下这些神奇功能的实现,您会发现比您想象地要简单得多。本文指的 Binlog 是 ROW 模式的 Binlog,这也是 MySQL 8 里的默认模式,STATEMENT 模式因为使用中有很多限制,现在用得越来越少了。
Binlog 的结构
Binlog 由事件(event)组成,请注意是事件(event)不是事务(transaction),一个事务可以包含多个事件。事件描述对数据库的修改内容。
从 MySQL 5 版本开始,Binlog 采用的是 v4 版本。事件的类型根据 MySQL 的内部文档,有下面 36 类:
enum Log_event_type {UNKNOWN_EVENT= 0,START_EVENT_V3= 1,QUERY_EVENT= 2,STOP_EVENT= 3,ROTATE_EVENT= 4,INTVAR_EVENT= 5,LOAD_EVENT= 6,SLAVE_EVENT= 7,CREATE_FILE_EVENT= 8,APPEND_BLOCK_EVENT= 9,EXEC_LOAD_EVENT= 10,DELETE_FILE_EVENT= 11,NEW_LOAD_EVENT= 12,RAND_EVENT= 13,USER_VAR_EVENT= 14,FORMAT_DESCRIPTION_EVENT= 15,XID_EVENT= 16,BEGIN_LOAD_QUERY_EVENT= 17,EXECUTE_LOAD_QUERY_EVENT= 18,TABLE_MAP_EVENT = 19,PRE_GA_WRITE_ROWS_EVENT = 20,PRE_GA_UPDATE_ROWS_EVENT = 21,PRE_GA_DELETE_ROWS_EVENT = 22,WRITE_ROWS_EVENT = 23,UPDATE_ROWS_EVENT = 24,DELETE_ROWS_EVENT = 25,INCIDENT_EVENT= 26,HEARTBEAT_LOG_EVENT= 27,IGNORABLE_LOG_EVENT= 28,ROWS_QUERY_LOG_EVENT= 29,WRITE_ROWS_EVENT = 30,UPDATE_ROWS_EVENT = 31,DELETE_ROWS_EVENT = 32,GTID_LOG_EVENT= 33,ANONYMOUS_GTID_LOG_EVENT= 34,PREVIOUS_GTIDS_LOG_EVENT= 35,ENUM_END_EVENT/* end marker */};
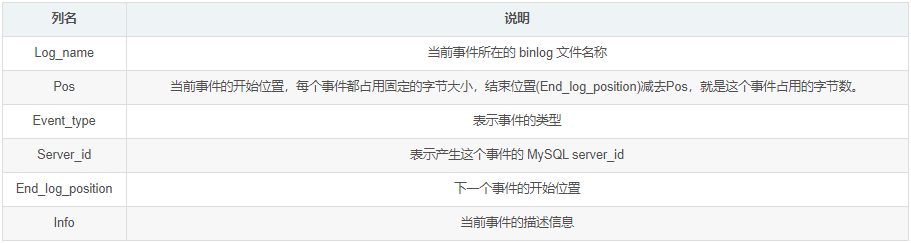
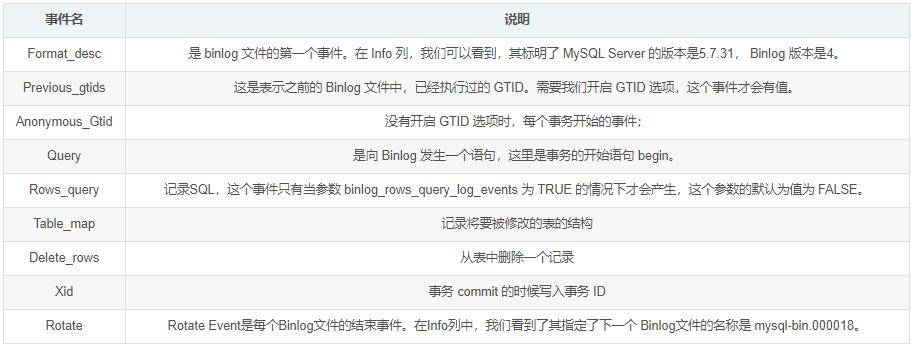
mysql> show binlog events in 'scut.000023';+-------------+-----+----------------+-----------+-------------+--------------------------------------------------------+| Log_name | Pos | Event_type | Server_id | End_log_pos | Info |+-------------+-----+----------------+-----------+-------------+--------------------------------------------------------+| scut.000023 | 4 | Format_desc | 1024 | 123 | Server ver: 5.7.31-0ubuntu0.16.04.1-log, Binlog ver: 4 || scut.000023 | 123 | Previous_gtids | 1024 | 154 | || scut.000023 | 154 | Anonymous_Gtid | 1024 | 219 | SET @@SESSION.GTID_NEXT= 'ANONYMOUS' || scut.000023 | 219 | Query | 1024 | 291 | BEGIN || scut.000023 | 291 | Rows_query | 1024 | 330 | # delete from tt1 || scut.000023 | 330 | Table_map | 1024 | 378 | table_id: 111 (test.tt1) || scut.000023 | 378 | Delete_rows | 1024 | 434 | table_id: 111 flags: STMT_END_F || scut.000023 | 434 | Xid | 1024 | 465 | COMMIT /* xid=216 */ || scut.000023 | 465 | Rotate | 1024 | 507 | scut.000024;pos=4 |+-------------+-----+----------------+-----------+-------------+--------------------------------------------------------+9 rows in set (0.00 sec)
https://dev.mysql.com/doc/internals/en/binary-log.html
+=====================================+| event | timestamp 0 : 4 || header +----------------------------+| | type_code 4 : 1 || +----------------------------+| | server_id 5 : 4 || +----------------------------+| | event_length 9 : 4 || +----------------------------+| | next_position 13 : 4 || +----------------------------+| | flags 17 : 2 || +----------------------------+| | extra_headers 19 : x-19 |+=====================================+| event | fixed part x : y || data +----------------------------+| | variable part |+=====================================+
恢复误删除的记录
现在我们已经了解了 Binlog 的结构,我们可以试着修改 Binlog 里的数据。例如前面举例的 Binlog 删除了一条记录,我们可以试着把这条记录恢复,Binlog 里面有个删除行(DELETE_ROWS_EVENT)的事件,就是这个事件删除了记录,这个事件和写行(WRITE_ROWS_EVENT)的事件的数据结构是完全一样的,只是删除行事件的类型是 32,写行事件的类型是 30,我们把对应的 Binlog 位置的 32 改成 30 即可把已经删除的记录再插入回去。从前面的 “show binlog events” 里面可看到这个 DELETE_ROWS_EVENT 是从位置 378 开始的,这里的位置就是 Binlog 文件的实际位置(以字节为单位)。从事件(event)的结构里面可以看到 type_code 是在 event 的第 5 个字节,我们写个 Python 小程序把把第383(378+5=383)字节改成 30 即可。当然您也可以用二进制编辑工具来改。
下面是这个 Python 小程序的例子:
#! /usr/bin/python3import sysif len(sys.argv) != 3:print ('Please run chtype.py inputType changedType.')sys.exit()inputType=open(sys.argv[1],"rb")changedType=open(sys.argv[2],"wb")changedType.write(inputType.read(382))changedType.write(chr(30).encode())inputType.seek(1,1)while True:line = inputType.readline()if not line:breakchangedType.write(line)inputType.close()changedType.close()

$ mysql -e "select * from test.tt1";$ mysqlbinlog ./scut.000023_ch |mysql$ mysql -e "select * from test.tt1";+---------------------+| col1 |+---------------------+| aaaaaaaaaaaaaaaaaaa |+---------------------+$ mysqlbinlog ./scut.000023 |mysql$ mysql -e "select * from test.tt1";$ mysqlbinlog ./scut.000023_ch |mysql$ mysql -e "select * from test.tt1";+---------------------+| col1 |+---------------------+| aaaaaaaaaaaaaaaaaaa |+---------------------+
我们发现这两个 Binlog 可以分别把对应的记录删除和插入到 MySQL 数据库中,这样我们就成功地实现了类似于 Oracle 的 flashback 功能。
找出 Binlog 中的大事务
由于 ROW 模式的 Binlog 是每一个变更都记录一条日志,因此一个简单的 SQL,在 Binlog 里可能会产生一个巨无霸的事务,例如一个不带 where 的 update 或 delete 语句,修改了全表里面的所有记录,每条记录都在 Binlog 里面记录一次,结果是一个巨大的事务记录。这样的大事务经常是产生麻烦的根源。我的一个客户有一次向我抱怨,一个 Binlog 前滚,滚了两天也没有动静,我把那个 Binlog 解析了一下,发现里面有个事务产生了 1.4G 的记录,修改了 66 万条记录!下面是一个简单的找出 Binlog 中大事务的 Python 小程序,我们知道用 mysqlbinlog 解析的 Binlog,每个事务都是以 BEGIN 开头,以 COMMIT 结束。我们找出 BENGIN 前面的 “# at” 的位置,检查 COMMIT 后面的 “# at” 位置,这两个位置相减即可计算出这个事务的大小,下面是这个 Python 程序的例子。
$ cat ./checkBigTran.py#! /usr/bin/python3import sysposition=0beginPosition=0endPosition=0maxSize=0isEnd=0for line in sys.stdin:if line[: 4]=='# at':position=int(line[5:])if isEnd:endPosition=positionisEnd=0if line[: 5]=='BEGIN':beginPosition=positionif line[: 6]=='COMMIT':isEnd=1if endPosition-beginPosition>maxSize:maxBeginPosition= beginPositionmaxEndPosition=endPositionmaxSize=endPosition-beginPositionprint("The largest transaction size is %d, the begion position is %d, the end position is %d." % (maxSize,maxBeginPosition,maxEndPosition))
$ mysqlbinlog binlog1|./checkBigTran.pyThe largest transaction size is 1468183501, the begion position is 5737766, the end position is 1473921267.
发现里面果然包含了一个 1.4G 的大事务。
切割 Binlog 中的大事务
对于大的事务,MySQL 会把它分解成多个事件(注意一个是事务 TRANSACTION,另一个是事件 EVENT),事件的大小由参数 binlog-row-event-max-size 决定,这个参数默认是 8K。因此我们可以把若干个事件切割成一个单独的略小的事务,例如下面这个 Binlog:
mysql> show binlog events in 'scut.000025';+-------------+-----+----------------+-----------+-------------+--------------------------------------------------------+| Log_name | Pos | Event_type | Server_id | End_log_pos | Info |+-------------+-----+----------------+-----------+-------------+--------------------------------------------------------+| scut.000025 | 4 | Format_desc | 1024 | 123 | Server ver: 5.7.31-0ubuntu0.16.04.1-log, Binlog ver: 4 || scut.000025 | 123 | Previous_gtids | 1024 | 154 | || scut.000025 | 154 | Anonymous_Gtid | 1024 | 219 | SET @@SESSION.GTID_NEXT= 'ANONYMOUS' || scut.000025 | 219 | Query | 1024 | 291 | BEGIN || scut.000025 | 291 | Rows_query | 1024 | 343 | # insert into tt1 values ('1') || scut.000025 | 343 | Table_map | 1024 | 391 | table_id: 111 (test.tt1) || scut.000025 | 391 | Write_rows | 1024 | 429 | table_id: 111 flags: STMT_END_F || scut.000025 | 429 | Rows_query | 1024 | 481 | # insert into tt1 values ('2') || scut.000025 | 481 | Table_map | 1024 | 529 | table_id: 111 (test.tt1) || scut.000025 | 529 | Write_rows | 1024 | 567 | table_id: 111 flags: STMT_END_F || scut.000025 | 567 | Xid | 1024 | 598 | COMMIT /* xid=397 */ || scut.000025 | 598 | Rotate | 1024 | 640 | scut.000026;pos=4 |+-------------+-----+----------------+-----------+-------------+--------------------------------------------------------+12 rows in set (0.01 sec)
# cat splitTran.py#! /usr/bin/python3import sysif len(sys.argv) != 3:print ('Please run splitTrans.py inputBinlog changedBinlog.')sys.exit()inputBinlog=open(sys.argv[1],"rb")changedBinlog=open(sys.argv[2],"wb")changedBinlog.write(inputBinlog.read(429)) # read from the head of input binlog file to the first insert, then write into the changed binlog file.firstInsert=inputBinlog.tell()inputBinlog.seek(567,0) # locate to the xid eventchangedBinlog.write(inputBinlog.read(31)) # read from 567 to 598, write xid event, into the changed binlog file.inputBinlog.seek(154,0) # locate to the Anonymous_Gtid, Query events.changedBinlog.write(inputBinlog.read(137)) # read from 154 to 291, write Anonymous_Gtid, Query events into changed binlog file.inputBinlog.seek(firstInsert)while True:line = inputBinlog.readline()if not line:breakchangedBinlog.write(line)inputBinlog.close()changedBinlog.close()
$ ./splitTran.py scut.000025 scut.000025_ch$ mysqlbinlog scut.000025_ch |mysql
mysql> show binlog events in 'scut.000026';+-------------+-----+----------------+-----------+-------------+------------------------------------------------------------------------------------------------------------------------------------+| Log_name | Pos | Event_type | Server_id | End_log_pos | Info |+-------------+-----+----------------+-----------+-------------+------------------------------------------------------------------------------------------------------------------------------------+| scut.000026 | 4 | Format_desc | 1024 | 123 | Server ver: 5.7.31-0ubuntu0.16.04.1-log, Binlog ver: 4 || scut.000026 | 123 | Previous_gtids | 1024 | 154 | || scut.000026 | 154 | Anonymous_Gtid | 1024 | 219 | SET @@SESSION.GTID_NEXT= 'ANONYMOUS' || scut.000026 | 219 | Query | 1024 | 287 | BEGIN || scut.000026 | 287 | Rows_query | 1024 | 439 | # BINLOG 'EbA7XxMABAAAMAAAAIcBAAAAAG8AAAAAAAEABHRlc3QAA3R0MQAB/gL+QAEYYumNEbA7Xx4ABAAAJgAAAK0BAAAAAG8AAAAAAAEAAgAB//4BMeeyFcw=' || scut.000026 | 439 | Table_map | 1024 | 487 | table_id: 111 (test.tt1) || scut.000026 | 487 | Write_rows | 1024 | 525 | table_id: 111 flags: STMT_END_F || scut.000026 | 525 | Xid | 1024 | 556 | COMMIT /* xid=425 */ || scut.000026 | 556 | Anonymous_Gtid | 1024 | 621 | SET @@SESSION.GTID_NEXT= 'ANONYMOUS' || scut.000026 | 621 | Query | 1024 | 689 | BEGIN || scut.000026 | 689 | Rows_query | 1024 | 841 | # BINLOG 'F7A7XxMABAAAMAAAABECAAAAAG8AAAAAAAEABHRlc3QAA3R0MQAB/gL+QAE+WKbjF7A7Xx4ABAAAJgAAADcCAAAAAG8AAAAAAAEAAgAB//4BMmfP2Zk=' || scut.000026 | 841 | Table_map | 1024 | 889 | table_id: 111 (test.tt1) || scut.000026 | 889 | Write_rows | 1024 | 927 | table_id: 111 flags: STMT_END_F || scut.000026 | 927 | Xid | 1024 | 958 | COMMIT /* xid=432 */ |+-------------+-----+----------------+-----------+-------------+------------------------------------------------------------------------------------------------------------------------------------+14 rows in set (0.00 sec)
我们看到两个 insert 已经分开到两个事务里面了。
后记
ROW 模式下,即使我们只更新了一条记录的其中某个字段,也会记录每个字段变更前后的值,这个行为是 binlog_row_image 参数控制的,这个参数有 3 个值,默认为 FULL,也就是记录列的所有修改,即使字段没有发生变更也会记录。这样我们就可以实现类似 Oracle 的 flashback 的功能,我个人估计 MySQL 未来的版本从可能会基于 Binlog 推出这样的功能。
了解了 Binlog 的结构,再加上 Python 这把瑞士军刀,我们还可以实现很多功能,例如我们可以统计哪个表被修改地最多?我们还可以把 Binlog 切割成一段一段的,然后再重组,可以灵活地进行 MySQL 数据库的修改和迁移等工作。