在这篇文章中,我们将了解如何将 MySQL 8.2 的读写分离功能与 MySQL-Connector/Python 一起使用。
作者:Frederic Descamps,MySQL 社区经理
本文和封面来源:https://blogs.oracle.com/,爱可生开源社区翻译。
本文约 1200 字,预计阅读需要 4 分钟。
如您所知,MySQL 8.2 发布了最令人期待的功能之一:读写分离。
在这篇文章中,我们将了解如何将它与 MySQL-Connector/Python 一起使用。
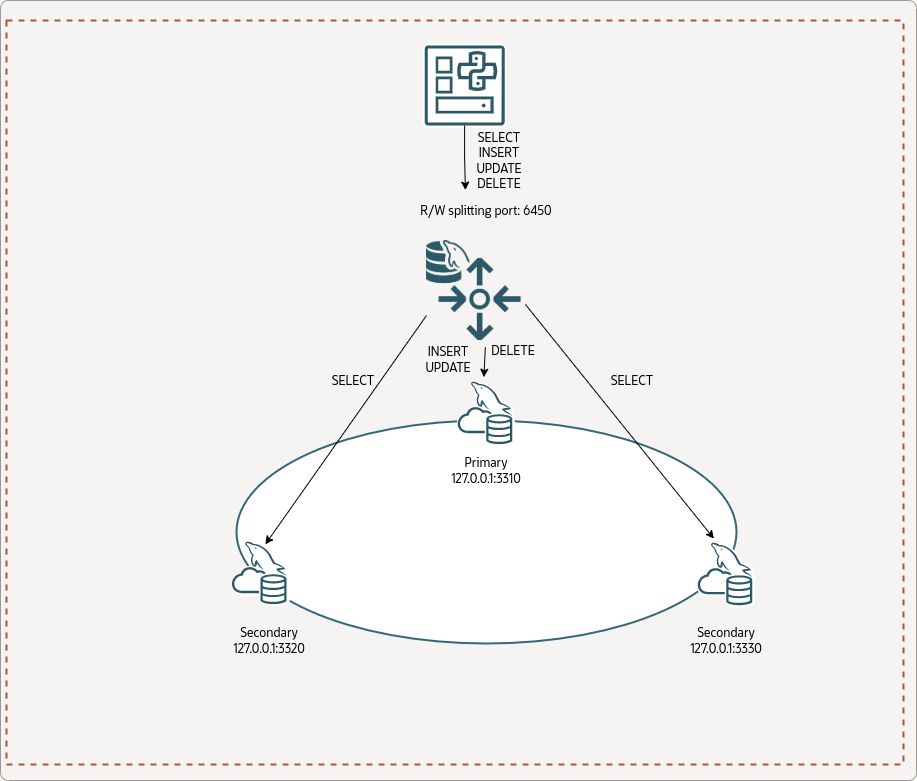
架构
为了使用我们的 Python 程序,我们将使用 InnoDB Cluster。
以下是在 MySQL Shell 中查询 Cluster 的状态:
JS > cluster.status()
{
    "clusterName": "fred",
    "defaultReplicaSet": {
        "name": "default",
        "primary": "127.0.0.1:3310",
        "ssl": "REQUIRED",
        "status": "OK",
        "statusText": "Cluster is ONLINE and can tolerate up to ONE failure.",
        "topology": {
            "127.0.0.1:3310": {
                "address": "127.0.0.1:3310",
                "memberRole": "PRIMARY",
                "mode": "R/W",
                "readReplicas": {},
                "replicationLag": "applier_queue_applied",
                "role": "HA",
                "status": "ONLINE",
                "version": "8.2.0"
            },
            "127.0.0.1:3320": {
                "address": "127.0.0.1:3320",
                "memberRole": "SECONDARY",
                "mode": "R/O",
                "readReplicas": {},
                "replicationLag": "applier_queue_applied",
                "role": "HA",
                "status": "ONLINE",
                "version": "8.2.0"
            },
            "127.0.0.1:3330": {
                "address": "127.0.0.1:3330",
                "memberRole": "SECONDARY",
                "mode": "R/O",
                "readReplicas": {},
                "replicationLag": "applier_queue_applied",
                "role": "HA",
                "status": "ONLINE",
                "version": "8.2.0"
            }
        },
        "topologyMode": "Single-Primary"
    },
    "groupInformationSourceMember": "127.0.0.1:3310"
}

JS > cluster.listRouters()
{
    "clusterName": "fred",
    "routers": {
        "dynabook::system": {
            "hostname": "dynabook",
            "lastCheckIn": "2023-11-09 17:57:59",
            "roPort": "6447",
            "roXPort": "6449",
            "rwPort": "6446",
            "rwSplitPort": "6450",
            "rwXPort": "6448",
            "version": "8.2.0"
        }
    }
}
MySQL Connector/Python
Python 程序使用 MySQL-Connector/Python 8.2.0。
初始化测试脚本代码:
import mysql.connector

cnx = mysql.connector.connect(user='python',
                              passowrd='Passw0rd!Python',
                              host='127.0.0.1',
                              port='6450')

cursor = cnx.cursor()

query = ("""select member_role, @@port port
            from performance_schema.replication_group_members
            where member_id=@@server_uuid""")

for (role, port) in cursor:
    print("{} - {}".format(role, port))

cursor.close()
cnx.close()
我们可以测试一下:
$ python test_router.py
PRIMARY - 3310
很好,我们可以使用读/写分离端口(6540)连接到集群并执行查询……。哦 ?!但为什么我们会直达主实例呢?
我们不应该是去访问只读实例(副本实例)之一吗?
autocommit
Connector/Python 默认禁用自动提交(请参阅 MySQLConnection.autocommit 属性)。并且读写分离功能必须启用自动提交才能正常工作。
在第 8 行上方添加以下代码:
cnx.autocommit = True
然后我们可以再次运行该程序:
$ python test_router.py
SECONDARY - 3320
$ python test_router.py
SECONDARY - 3330
太棒了,达到预期效果工作!
查询属性
现在让我们看看如何在主节点上强制执行查询。
MySQL Router 提供了使用查询属性来强制执行读/写拆分决策的可能性:router.access_mode。
在执行查询 ( cursor.execute(query) ) 之前添加以下行:
cursor.add_attribute("router.access_mode", "read_write")
让我们再执行一次:
$ python test_router.py
PRIMARY - 3310
router.access_mode 可接受的值为:
- auto
- read_only
- read_write
测试 DML 语句
让我们尝试一些不同的东西,我们将向表中插入行。
我们将使用下表:
CREATE TABLE `t1` (
  `id` int unsigned NOT NULL AUTO_INCREMENT,
  `port` int DEFAULT NULL,
  `role` varchar(15) DEFAULT NULL,
  `timestamp` timestamp NULL DEFAULT CURRENT_TIMESTAMP,
  PRIMARY KEY (`id`)
) ENGINE=InnoDB ;
我们将使用以下 Python 脚本:
import mysql.connector

cnx = mysql.connector.connect(user='python',
                              password='Passw0rd!Python',
                              host='127.0.0.1',
                              port='6450',
                              database='test')
cnx.autocommit = True
cursor = cnx.cursor()

for i in range(3):
    query = ("""insert into t1 values(0, @@port, (
          select member_role
            from performance_schema.replication_group_members
            where member_id=@@server_uuid), now())""")
    cursor.execute(query)

cursor.close()
cnx.close()

for i in range(3):
    cnx = mysql.connector.connect(user='python',
                              password='Passw0rd!Python',
                              host='127.0.0.1',
                              port='6450',
                              database='test')
    cnx.autocommit = True
    cursor = cnx.cursor()
    query = ("""select *, @@port port_read from t1""")
    cursor.execute(query)
    for (id, port, role, timestamp, port_read) in cursor:
             print("{} : {}, {}, {} : read from {}".format(id,
                                             port,
                                             role,
                                             timestamp,
                                             port_read))

    cursor.close()
    cnx.close()
让我们执行它:
$ python test_router2.py
1 : 3310, PRIMARY, 2023-11-09 17:44:00 : read from 3330
2 : 3310, PRIMARY, 2023-11-09 17:44:00 : read from 3330
3 : 3310, PRIMARY, 2023-11-09 17:44:00 : read from 3330
1 : 3310, PRIMARY, 2023-11-09 18:44:00 : read from 3320
2 : 3310, PRIMARY, 2023-11-09 18:44:00 : read from 3320
3 : 3310, PRIMARY, 2023-11-09 18:44:00 : read from 3320
1 : 3310, PRIMARY, 2023-11-09 17:44:00 : read from 3330
2 : 3310, PRIMARY, 2023-11-09 17:44:00 : read from 3330
3 : 3310, PRIMARY, 2023-11-09 17:44:00 : read from 3330
我们可以看到没有错误,并且我们写入了主节点并从所有辅助节点读取。
请小心,如果在写入之前将 router.access_mode 的查询属性设置为 read_only(第 16 行),您将收到错误,因为副本节点上不允许写入:
_mysql_connector.MySQLInterfaceError: The MySQL server is running with the --super-read-only option so it cannot execute this statement
事务
现在我们要玩一下事务。我们创建一个新脚本来执行多个事务:
- 自动提交中的读操作
- 事务中的读操作(默认情况下,这是读/写事务)
- 只读事务中的读操作
- 具有多次插入和回滚的事务
这是程序的源码:
import mysql.connector

cnx = mysql.connector.connect(user='python',
                              password='Passw0rd!Python',
                              host='127.0.0.1',
                              port='6450',
                              database='test')
cnx.autocommit = True
cursor = cnx.cursor()
query = ("""select member_role, @@port port
            from performance_schema.replication_group_members
            where member_id=@@server_uuid""")
cursor.execute(query)

for (role, port) in cursor:
    print("{} - {}".format(role, port))

cnx.start_transaction()
query = ("""select member_role, @@port port
            from performance_schema.replication_group_members
            where member_id=@@server_uuid""")
cursor.execute(query)

for (role, port) in cursor:
    print("{} - {}".format(role, port))

cnx.commit()

cnx.start_transaction(readonly=True)
query = ("""select member_role, @@port port
            from performance_schema.replication_group_members
            where member_id=@@server_uuid""")
cursor.execute(query)

for (role, port) in cursor:
    print("{} - {}".format(role, port))


cnx.commit()

cnx.start_transaction()

for i in range(3):
    query = ("""insert into t1 values(0, @@port, (
          select member_role
            from performance_schema.replication_group_members
            where member_id=@@server_uuid), now())""")
    cursor.execute(query)

cnx.rollback()
cursor.close()

cnx.close()
让我们执行脚本:
$ python test_router3.py
SECONDARY - 3320
PRIMARY - 3310
SECONDARY - 3320
我们可以看到,第一个操作到达了副本实例,第二个操作(即事务)到达了主节点。
只读事务到达副本节点。
对于作为我们回滚事务一部分的多次写入,我们没有收到任何错误。
结论
我们已经看到将 MySQL Connector/Python 与 MySQL 8.2 读写分离一起用于 InnoDB Cluster 是多么容易。
享受通过 MySQL Connector / Python 使用 MySQL 读写分离!